
Most Trending
-
 ปลายๆ กุมภา 57 : กรุงเทพ อากาศร้อนใช้ได้เลย... ความชื้นสัมพัทธ์ ประมาณนี้กำลังอึดอัด เหนี่ยวเหนอะ สุดๆ (ความชื้นที่กำลังสบา...
 -
 บอกเลยว่าคลำอยู่หลายชั่วโมง กว่าจะทำให้ มันแสดงผลได้ ....ตอนแรกพยายามพ่วง RTC แต่ทดลองแล้วปรากฎว่า ไม่สามารถตั้งเวลาได้เลยเอาออกก่อน .... ...
 -
 เผอิญจะต่อ LED กับ arduino ปรากฏว่าซื้อมาแล้ว ต่อกับบอร์ดปรากฏว่ามันไม่ติด...งง เป็นไปได้จะใด? สรุป เป็นแบบนี้ ปกติผมใช้แต่ LED ชนิด 4 ขา ม...
 -
 PIR sensor กับ Arduino คำค้นใน google : arduino with pir sensor หรือ arduino pir motion sensor พิมพ์ลงไปประมาณนี้ เดี๋ยว google มันจะแน...
 -
 DS18B20 เป็นหนึ่งในตระกูล DS18XXX ที่ปัจจุบัน เปลี่ยนเจ้าของจาก Dallas ไปสู่ MAXIM เรียบร้อยแล้วดาต้าชีต อยู่ที่นี่ DS18B20 data sheet by MA...
 -
 เขียนหน้านี้สักเล็กน้อยกันลืม เกี่ยวกับไฟใช้เลี้ยงบอร์ด Pro mini และขั้วต่อ ว่ามันอยู่ตรงไหน ดูภาพประกอบ ไฟเข้าขั้วบวก-ลบสำหรับเลี...
 -
ยังไม่ว่างลองโปรเจ็กใหม่ ช่วงนี้ยุ่งจริง ไหนงานเก่ากำลังจะออก ... งานใหม่ต้องหา สถานการณ์บ้านเมืองยังประท้วงกันวุ่นวาย มา ต่อกับ arduin...
-
 ออกตัวก่อนนะครับ สำหรับคนที่แวะมาเจอ blog นี้ โปรดอย่าคิดว่าผมเป็นเซียน arduino หรือ ไมโครคอนโทรลเลอร์ หรือ มีอาชีพเป็นโปรแกรมเม...
 -
 ยำรวมกันโปรเจ็กที่เท่าไหร่ก็ไม่ทราบแล้ว ข้อควรทราบเมื่อใช้งาน Ethernet Shield WZ5100 คือ จุดต่อที่ห้ามใช้คือ pins A0, A1, D4, and D10-D...
 -
draft บทความก่อนโพส 1. การทดลองใช้ LD1117 เพื่อลดแรงดันปลายทางให้เหลือ 3.3V ต้นทางจากเว็บนี้ LD1117-voltage-regulators Read from Arduino ...
Popular Posts
-
ปลายๆ กุมภา 57 : กรุงเทพ อากาศร้อนใช้ได้เลย... ความชื้นสัมพัทธ์ ประมาณนี้กำลังอึดอัด เหนี่ยวเหนอะ สุดๆ (ความชื้นที่กำลังสบา...
-
บอกเลยว่าคลำอยู่หลายชั่วโมง กว่าจะทำให้ มันแสดงผลได้ ....ตอนแรกพยายามพ่วง RTC แต่ทดลองแล้วปรากฎว่า ไม่สามารถตั้งเวลาได้เลยเอาออกก่อน .... ...
-
เผอิญจะต่อ LED กับ arduino ปรากฏว่าซื้อมาแล้ว ต่อกับบอร์ดปรากฏว่ามันไม่ติด...งง เป็นไปได้จะใด? สรุป เป็นแบบนี้ ปกติผมใช้แต่ LED ชนิด 4 ขา ม...
-
PIR sensor กับ Arduino คำค้นใน google : arduino with pir sensor หรือ arduino pir motion sensor พิมพ์ลงไปประมาณนี้ เดี๋ยว google มันจะแน...
-
DS18B20 เป็นหนึ่งในตระกูล DS18XXX ที่ปัจจุบัน เปลี่ยนเจ้าของจาก Dallas ไปสู่ MAXIM เรียบร้อยแล้วดาต้าชีต อยู่ที่นี่ DS18B20 data sheet by MA...
-
เขียนหน้านี้สักเล็กน้อยกันลืม เกี่ยวกับไฟใช้เลี้ยงบอร์ด Pro mini และขั้วต่อ ว่ามันอยู่ตรงไหน ดูภาพประกอบ ไฟเข้าขั้วบวก-ลบสำหรับเลี...
-
ยังไม่ว่างลองโปรเจ็กใหม่ ช่วงนี้ยุ่งจริง ไหนงานเก่ากำลังจะออก ... งานใหม่ต้องหา สถานการณ์บ้านเมืองยังประท้วงกันวุ่นวาย มา ต่อกับ arduin...
-
ออกตัวก่อนนะครับ สำหรับคนที่แวะมาเจอ blog นี้ โปรดอย่าคิดว่าผมเป็นเซียน arduino หรือ ไมโครคอนโทรลเลอร์ หรือ มีอาชีพเป็นโปรแกรมเม...
-
ยำรวมกันโปรเจ็กที่เท่าไหร่ก็ไม่ทราบแล้ว ข้อควรทราบเมื่อใช้งาน Ethernet Shield WZ5100 คือ จุดต่อที่ห้ามใช้คือ pins A0, A1, D4, and D10-D...
-
draft บทความก่อนโพส 1. การทดลองใช้ LD1117 เพื่อลดแรงดันปลายทางให้เหลือ 3.3V ต้นทางจากเว็บนี้ LD1117-voltage-regulators Read from Arduino ...
Archive for กรกฎาคม 2014
Arduino UNO R3 + Ethernet Shield + PIR + MQ2 + DHT11
ยำรวมกันโปรเจ็กที่เท่าไหร่ก็ไม่ทราบแล้ว
ข้อควรทราบเมื่อใช้งาน Ethernet Shield WZ5100 คือ จุดต่อที่ห้ามใช้คือ pins A0, A1, D4, and D10-D13
ดังนั้น pin ที่เราจะใช้ได้คือ pin อื่น นอกเหนือจากที่แจ้งไว้
โปรเจ็กนี้
 |
| MQ2 gas sensor |
PIR ใช้ pin2
MQ2 ใช้ A3
จุดสังเกตุ เมื่อ PIR ตรวจเจออะไร ค่า MQ2 ที่แสดง จะแกว่งแป๊บนึง ก่อนกลับมาสู่จุดปกติ
หน้าตาใน command จะเป็นแบบนี้

CODE
#include <dht.h>
dht DHT;
#define DHT11_PIN 3 //
#define DHTTYPE DHT11
const int analogInPin = A3; // Analog input pin that the potentiometer is attached to
const int analogOutPin = 9; // choose the pin for the LED
int sensorValue = 0; // value read from the pot
int inputPin2 = 2; // choose the input pin (for PIR sensor)
int ledPin2 = 13;
int pirState = LOW; // we start, assuming no motion detected
int val = 0; // variable for reading the pin status
int pinSpeaker2 = 10; //Set up a speaker on a PWM pin (digital 9, 10, or 11)
void setup() {
Serial.begin(9600);
delay(300);//Let system settle
Serial.println("Humidity and temperature\n\n");
delay(700);//Wait rest of 1000ms recommended delay before
//accessing sensor
pinMode(analogOutPin, OUTPUT);
pinMode(ledPin2, OUTPUT); // declare LED as output
pinMode(inputPin2, INPUT); // declare sensor as input
pinMode(pinSpeaker2, OUTPUT);
Serial.begin(9600);
}
void loop(){
DHT.read11(DHT11_PIN);
Serial.print("Current humidity = ");
Serial.print(DHT.humidity);
Serial.print("% ");
Serial.print("temperature = ");
Serial.print(DHT.temperature);
Serial.println("C ");
delay(800);
val = digitalRead(inputPin2); // read input value
if (val == HIGH) { // check if the input is HIGH
digitalWrite(ledPin2, HIGH); // turn LED ON
playTone(300, 160); // เดิม 300, 160)
delay(100); // เดิม 150
if (pirState == LOW) {
// we have just turned on
Serial.println("Motion detected!");
// We only want to print on the output change, not state
pirState = HIGH;
}
} else {
digitalWrite(ledPin2, LOW); // turn LED OFF
playTone(0, 0);
delay(300);
if (pirState == HIGH){
// we have just turned of
Serial.println("Motion ended!");
// We only want to print on the output change, not state
pirState = LOW;
}
}
// read the analog in value:
sensorValue = analogRead(analogInPin);
// determine alarm status
if (sensorValue >=750)
{
digitalWrite(analogOutPin, HIGH); // sets the LED on
}
else
{
digitalWrite(analogOutPin, LOW); // sets the LED off
}
// print the results to the serial monitor:
Serial.print("sensor = " );
Serial.println(sensorValue);
// wait 10 milliseconds before the next loop
// for the analog-to-digital converter to settle
// after the last reading:
delay(10);
}
// duration in mSecs, frequency in hertz
void playTone(long duration, int freq) {
duration *= 1000;
int period = (1.0 / freq) * 1000000;
long elapsed_time = 500; // เดิม 0
while (elapsed_time < duration) {
digitalWrite(pinSpeaker2,HIGH);
delayMicroseconds(period / 2);
digitalWrite(pinSpeaker2, LOW);
delayMicroseconds(period / 2);
elapsed_time += (period);
}
}
Arduino ทดสอบ LD1117 , Ethernet module ENC28J60
draft บทความก่อนโพส
1. การทดลองใช้ LD1117 เพื่อลดแรงดันปลายทางให้เหลือ 3.3V ต้นทางจากเว็บนี้ LD1117-voltage-regulators Read from Arduino
2. การทดลองใช้ Ethernet module ENC28J60
1. การทดลองใช้ LD1117 เพื่อลดแรงดันปลายทางให้เหลือ 3.3V ต้นทางจากเว็บนี้ LD1117-voltage-regulators Read from Arduino
2. การทดลองใช้ Ethernet module ENC28J60
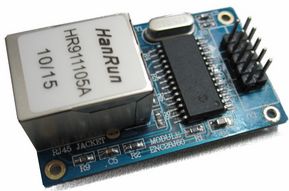
บทความ ENC28J60 Ethernet module
ไลบราลี่ มีหลายตัว ลองโหลดมาใช้ดู https://github.com/jcw/ethercard
Arduino + IR Receiver Module การใช้สารพัด Remote ควบคุมอุปกรณ์โดยผ่าน Arduino
Blog นี้ที่ทำขึ้นมา เพื่อต้องการรวบรวมข้อมูล , โครงงานที่ใช้ Arduino เป็นหลัก โดยแอดมินไล่เก็บบทความ หรือ เว็บต่างๆ ที่ไปคุ้ยๆ มาในเน็ต ข้อมูลส่วนใหญ่เป็นภาษาอังกฤษ แต่ไม่ยาก มั่วๆ ไล่ๆ วงจรก็พอได้
เก็บๆ รวบรวมไว้ก่อน เอาไว้อ่านย้อนเอาทีหลังตอนว่างๆ ใครสนใจเรื่อง arduino มาโพสแลกเปลี่ยนความรู้กันได้นะครับ
ตอนนี้จะเกี่ยวกับการใช้ arduino ในการอ่านโค้ดที่รับมาจากรีโมทคอนโทรล ส่วนจะใช้รีโมทอะไร ส่วนใหญ่ในเว็บจะทดลองโดยใช้รีโมททีวี เป็นหลัก ดังนั้นถ้าเราไม่อยากคลำมาก ก็ใช้รีโมททีวีตามเขาไป สะดวกดี ส่วนยี่ห้อไหนก็แล้วแต่ศรัทธา
Link แรก เลย arduino-ir-receiver อันที่ 1

multi-protocol-infrared-remote

arduino-ir-receiver

เก็บๆ รวบรวมไว้ก่อน เอาไว้อ่านย้อนเอาทีหลังตอนว่างๆ ใครสนใจเรื่อง arduino มาโพสแลกเปลี่ยนความรู้กันได้นะครับ
ตอนนี้จะเกี่ยวกับการใช้ arduino ในการอ่านโค้ดที่รับมาจากรีโมทคอนโทรล ส่วนจะใช้รีโมทอะไร ส่วนใหญ่ในเว็บจะทดลองโดยใช้รีโมททีวี เป็นหลัก ดังนั้นถ้าเราไม่อยากคลำมาก ก็ใช้รีโมททีวีตามเขาไป สะดวกดี ส่วนยี่ห้อไหนก็แล้วแต่ศรัทธา
Link แรก เลย arduino-ir-receiver อันที่ 1
multi-protocol-infrared-remote
arduino-ir-receiver
ไล่อ่านไปเรื่อยๆ เดี๋ยวไอเดียออกมาเอง
ขอบคุณที่ติดตาม Blog นี้นะครับ
ว่ากันด้วยเรื่องของ Wireless , WIFI Shield
แบบสำเร็จ หน้าตาประมาณนี้
http://www.elechouse.com/elechouse/index.php?main_page=product_info&cPath=74&products_id=2245

และมีอีกแนวที่น่าสนใจคือ ทำบอร์ดเอง แบบตัวอย่างนี้

PiWeather part 4 first PCBs
 ลองเข้าไปดูในเว็บเขา มีแบบพิมพ์เป็น Eagles Files ด้วย เจ๋งจริงๆ
http://www.elechouse.com/elechouse/index.php?main_page=product_info&cPath=74&products_id=2245
 | ||||
| Sheild ประกอบรวมกันกับ Wireless module และ Arduiono Uno Board |
และมีอีกแนวที่น่าสนใจคือ ทำบอร์ดเอง แบบตัวอย่างนี้